Hallo Leute
Da ich schon bei Git Hab den Eintrag gefunden habe und natürlich gleich versucht. Bin aber kläglich gescheiter.
# Equiva key-ble Smart Lock Integration with Home Assistant using keyble and keyble-mqtt

Hey there! Are you struggeling to integrate your eqiva smart lock into your smart home and control it using Home Assistant? Don't worry, there's a solution called keyble that allows you to control the Equiva key-ble Smart Lock using your computer and integrate it with Home Assistant.
This tutorial enables the integration of the Equiva key-ble Smart Lock into the Home Assistant system using keyble and keyble-mqtt. It allows you to conveniently control the door lock through the Home Assistant interface and trigger automated actions. You can lock, unlock, and open the door, as well as monitor the lock's status. However, it's important to note that the smart lock cannot handle two concurrent Bluetooth connections. If the manufacturer's official smartphone app is connected to the lock, keyble will not be able to connect to it simultaneously. Therefore, make sure to close the smartphone app for keyble to function properly.
Before we begin, I want to emphasize that making a door lock accessible over the network or the internet comes with certain security risks. If you choose to follow this guide, please be aware of the risks involved and take appropriate measures to secure your network and Home Assistant installation.
Alright, let's get started! I'll walk you through the steps on how to set up the Equiva key-ble Smart Lock with keyble and keyble-mqtt on a Raspberry Pi and integrate it with Home Assistant. Please note that you should already have a running Home Assistant instance and an MQTT broker installed. I won't cover the installation of these components in detail in this guide.
All Glory to https://github.com/oyooyo for developing key-ble!
## Prerequisites
Before we begin, make sure you meet the following prerequisites:
- A Raspberry Pi or another Linux device (I used the Raspberry Pi Zero 2 W for this guide, but you can use other devices like the Banana Pi M2 Zero, which is more affordable.)
- An installed Home Assistant instance (https://www.home-assistant.io/getting-started/)
show original
Ich konnte nicht mal die Erste Instillation durchführen weil lauter Fehler auftreten.
Kann mir da jemand von euch weiter helfen brauche ich da noch eine Installation von Node.js oder irgendwas anders. Komme ihr einfach nicht weiter.
Danke vorab schon mal
Gruß Matze
Am besten wäre es natürlich, wenn du uns die Fehlermeldungen hier schicken könntest. Ohne diese wird es extrem schwierig dir auch nur ansatzweise zu helfen.
➜ ~ sudo apt-get -y update && sudo apt-get -y dist-upgradehttps://deb.nodesource.com/setup_lts.x | sudo -E bash -which node)
Usage: readlink [-fnv] FILE
Display the value of a symlink
    -n      Don't add newline
    -f      Canonicalize by following all symlinks
    -v      Verbose
sudo: setcap: command not found
Das wäre der fehler
Achso ja.
➜ ~ sieht aus als ob du auf der CLI von Homeassistant gestartet seist. Hierbei handelt es ich nicht um ein Debian-Derivat und hat somit auch keinen APT Paketmanager. Verifizieren kannst du das ganze mit dem Befehl cat /etc/os-release da sollte dann das bei rauskommen:
➜  ~ cat /etc/os-release
NAME="Alpine Linux"
ID=alpine
VERSION_ID=3.21.3
PRETTY_NAME="Alpine Linux v3.21"
HOME_URL="https://alpinelinux.org/"
BUG_REPORT_URL="https://gitlab.alpinelinux.org/alpine/aports/-/issues"
Steht dann da aber auch nochmal schwarz auf weiß oder eher grün auf schwarz:
Error: This script is only supported on Debian-based systems.
Laut Tutorial wird ein Raspberry Pi Zero oder ein Maschine mit OS, das auf Debian basiert, vorausgesetzt. Für dich, mit offensichtlich wenigen Kenntnissen, daher etwas herausfordernd, da du das Tutorial dann nicht 1:1 nehmen kannst.
VG
2nice4u
14. November 2026 um 00:39
7
Ich hatte hier früher etwas zu keyble geschrieben. Inzwischen läuft mein Eqiva Bluetooth Smart Lock komplett über einen ESP32-C3 mit ESPHome – der ESP steuert das Schloss direkt per Bluetooth und ist über die normale ESPHome-Integration in Home Assistant eingebunden. Daraus ist ein eigenes Projekt geworden, das ich gern teilen möchte:
GitHub - 2nice4u/esphome-components-eqiva: ESPHome component for Eqiva Bluetooth smart lock Key-BLE – patched for reliability, security and power saving; examples with R503 fingerprint, schedule and web UI guide · GitHub
Basis ist die ESPHome-Komponente von digaus, die ich stark überarbeitet habe (Zuverlässigkeit, Sicherheit, Stromsparen).
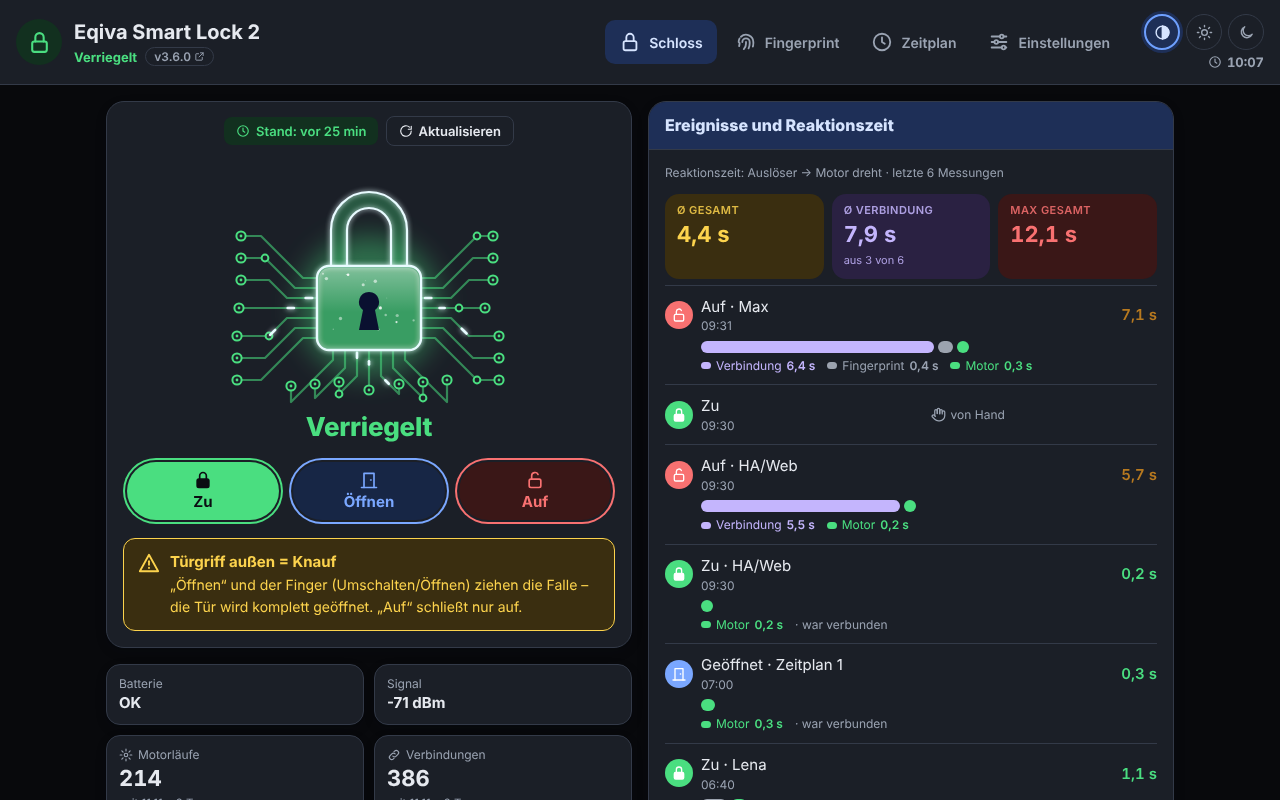
Läuft auch ohne Home Assistant – zu-, aufschließen und öffnen direkt am ESPEigene Web-App auf dem ESP (Handy/PC, hell/dunkel, ohne Internet): Bedienung, Pairing mit der Keycard, Schlossantrieb einstellen, EreignisseEnergiemodi Schnell / Ausgewogen / Sparsam (Sparsam verbindet nur bei Bedarf und schont die Schloss-Batterie)Ereignisprotokoll (wer, wann, von Hand) und Reaktionszeit aufgeschlüsselt in Verbindungsaufbau und MotorZähler für Motorläufe und Verbindungen mit „Batterien gewechselt“ und Verlauf – zum Vergleichen von Batterien und AkkusBis zu 6 Zeitpläne , optional mit zufälliger Abweichung, offline per SNTPOptional R503-Fingerprint : Personen/Finger anlernen, eigene Aktion pro Finger (z. B. Umschalten), Sabotage-Erkennung
Optional WS2812-Status-LED und Testmodus ohne Schloss
Eqiva Bluetooth Smart Lock mit Keycard (für das Pairing)
ESP32 (bei mir ein ESP32-C3 mini in der Nähe des Schlosses)
ESPHome (getestet mit 2026.10)
Die Anleitung (Pairing, Einstellungen, Fingerprint, Zeitpläne, Fehlersuche) steht im Repo unter docs/ANLEITUNG.md, Beispiel-YAMLs unter examples/.
Ich freue mich über Rückmeldungen und Erfahrungen – gerade zu anderen ESP-Boards und Reichweiten.